- Step 1: Add Data in a Custom Session, on 'Add to Cart' Button Click. ...
- Step 2: Add Custom Data in WooCommerce Session. ...
- Step 3: Extract Custom Data from WooCommerce Session and Insert it into Cart Object. ...
- Step 4: Display User Custom Data on Cart and Checkout page. ...
- Step 5: Add Custom Data as Metadata to the Order Items.
- How do I add a custom field to a WooCommerce order page?
- How do you add custom fields to WooCommerce products and subsequently through the order cycle?
- How do I create a custom field value in WooCommerce?
- How do I add custom metadata to WordPress?
- How do I customize a WooCommerce checkout form?
- How do I add a custom field in WooCommerce checkout without plugin?
- How do I display custom fields in WooCommerce?
- How do I create a custom WooCommerce plugin?
- How do I create a custom variation in WooCommerce?
- How do I add a custom field to checkout in WordPress?
- How do I create a custom field value in WordPress?
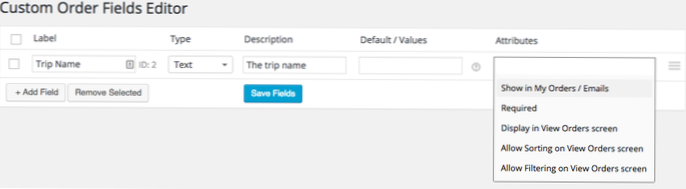
How do I add a custom field to a WooCommerce order page?
First, to create a field, go to WooCommerce > Custom Order Fields. Click “Add Field” and begin creating your order field. The “label” is the field name, and will be displayed in the order details. The “description” will be displayed to the user upon hovering over the “?” symbol.
How do you add custom fields to WooCommerce products and subsequently through the order cycle?
1 Answer
- Display a custom field on admin product under inventory tab.
- Display a custom field on admin product under variations tab for each variation.
- Save the custom field value for products and product variations.
- Display the custom field value on single product pages (also for each selected variation)
How do I create a custom field value in WooCommerce?
How to display custom field value on product page in Woocommerce?
- Enter the name and value text of your choice and click on Add Custom Field button. ...
- Save the changes by clicking on Update button. ...
- Now, we are going to display custom field value on product page. ...
- From the editor click find content-single-product.
How do I add custom metadata to WordPress?
Simply create a new post or edit an existing one. Go to the custom fields meta box and select your custom field from the drop down menu and enter its value. Click on 'Add Custom Field' button to save your changes and then publish or update your post.
How do I customize a WooCommerce checkout form?
Setup and Configuration
- Go to: WooCommerce > Checkout Fields.
- There are three sets of Fields you can edit:
- Disabled fields.
- Select the Add Field button.
- Enter your text and preferences.
- Save Changes.
How do I add a custom field in WooCommerce checkout without plugin?
How to Add Custom Fields to WooCommerce Checkout Page
- Step 1: Define an Array of Fields on Checkout Page. ...
- Step 2: Add Custom Fields to WooCommerce Checkout Page. ...
- Step 3: Concatenate Fields as per Requirement. ...
- Step 4: Display Custom Fields on Order Page. ...
- Step 5: Display Fields on Account Page.
How do I display custom fields in WooCommerce?
Method 1: How to create WooCommerce custom fields for the WooCommerce product page
- First, add a name for the Field Group. ...
- Location – Select Show this field group if Post Type is equal to Product. ...
- Press the blue 'Add Field' button. ...
- Add a Label for the custom field. ...
- Type a lowercase Name for the custom field.
How do I create a custom WooCommerce plugin?
Steps for creating a plugin for WooCommerce :
- Download and activate the latest version of WooCommerce from here: https://wordpress.org/plugins/woocommerce/
- create new folder for our new plugin in wp-content/plugin/ directory. ...
- WC_Integration class file. ...
- plugin file. ...
- create settings link for the plugin.
How do I create a custom variation in WooCommerce?
Manually Add a Variation
- Select Add variation from the dropdown menu, and select Go.
- Select attributes for your variation. To change additional data, click the triangle icon to expand the variation.
- Edit any available data. The only required field is Regular Price.
- Click Save changes.
How do I add a custom field to checkout in WordPress?
To add custom fields to WooCommerce checkout, select the field type in Add New Field section, enter a label name and click on Add Field.
- And it's done! ...
- Here you can enable or disable a field (even the WooCommerce default ones), or set it as required. ...
- In the Appearance tab, you can set Placeholder and CSS Class.
How do I create a custom field value in WordPress?
The default way to show custom fields in WordPress would be to:
- Open the single. php file or page. ...
- Find the_content function so you can list your custom field data after the actual content of the post or page.
- Use the get_post_meta function to fetch custom field values using their meta key then list them using PHP echo.