- How do I enable a database plugin?
- How do I disable a database plugin?
- How do I disable all plugins?
- How do I enable plugins in file manager?
- How do I enable plugins without admin?
- How do I enable an FTP plugin?
- How do I disable plugins in file manager?
- How do I disable plugins?
- How do I disable FTP plugins?
- What happens if you disable plugins?
- Does deactivating plugin delete data?
- What database does WP use?
How do I enable a database plugin?
General technique
- Step 1: Copy the active_plugins array. Using a tool such as phpMyAdmin, enter the following SQL command: SELECT * FROM wp_options WHERE option_name = 'active_plugins' ...
- Step 2: Unfold the active_plugins array. ...
- Step 3: Add another plugin to the array. ...
- Step 4: Update the active_plugins array.
How do I disable a database plugin?
Quick steps:
- Login to the cPanel account and go to File Manager.
- Find the database from the wp-config.php file situated in the website's document root.
- Go to PHPMyAdmin and select the database.
- Select the table named wp_options and go to active_plugins.
- Change the option_value to a:0: for disabling the plugins.
How do I disable all plugins?
Go to Plugins > Installed Plugins. Click the checkbox at the top of the list to select all plugins. Open the Bulk Actions menu and select Deactivate.
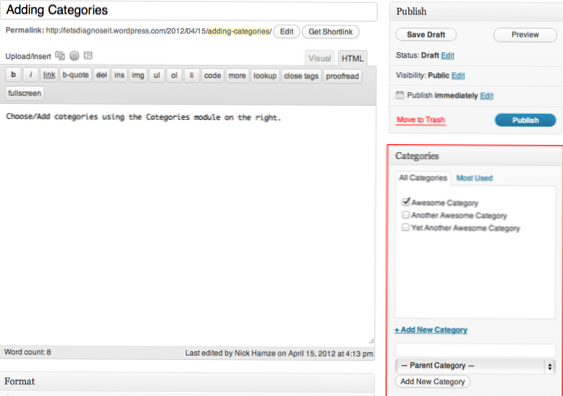
How do I enable plugins in file manager?
Step 1: Determine the Database Name
- Log into cPanel.
- In the Files section, click File Manager.
- On the left side, select public_html.
- Click the Settings button found on the top right-hand corner.
- Put a checkmark on the Show Hidden Files (dotfiles) box. The Web Root (public_html or www) is selected in default.
- Click Save.
How do I enable plugins without admin?
How to install and activate plugin manually without wp-admin dashboard
- Step1: Download the plugin you wanted to install, in my case its “shortcoder” plugin. ...
- Step2: ...
- Step3. ...
- Being aware of the DB name, now you can log in to hosting provider and launch phpmyAdmin.
How do I enable an FTP plugin?
There are 3 steps in this tutorial.
- Step 1 - Extract the WordPress plugin ZIP file to a folder on your computer. First please extract the plugin ZIP file on your local computer. ...
- Step 2 - Upload the plugin folder to your FTP server. ...
- Step 3 - Activate the plugin.
How do I disable plugins in file manager?
Disable All WordPress Plugins in cPanel
- Login to your cPanel.
- Click the File Manager in the Files section.
- Navigate to your WordPress installation folder, and open the.
- Right-click the plugins folder, then select Rename.
- Rename the plugins folder, for example “plugins. old” then click the.
How do I disable plugins?
Simply navigate to the Plugins tab, where you'll find a list of installed plugins:
- Find the plugin you want to deactivate and click Deactivate. ...
- Once you click Deactivate, WordPress will deactivate the plugin. ...
- Navigate to the wp-content/plugins folder.
How do I disable FTP plugins?
FTP
- Connect to your server via FTP. Connect to your server via FTP. ...
- Navigate to your websites root folder. Navigate to your websites root folder. ...
- Navigate to the /wp-content folder.
- Select the /plugins folder. Then rename it to something like plugins. ...
- All your plugins will now be disabled.
What happens if you disable plugins?
Once you deactivate the plugin, it still remains installed on your website, but WordPress will stop loading it. If you want to start using the plugin again, then you will just need to click on the Activate link below it.
Does deactivating plugin delete data?
No. If you deactivate or remove the plugin from your web, you won't lose any data. ... But you can also remove a plugin by using an FTP client and removing the plugin's directory (in this case, …/wp-content/plugins/nelio-content/ ).
What database does WP use?
WordPress uses a database management system called MySQL, which is open source software. This means you'll sometimes hear your site's database referred to as a “MySQL database.” MySQL is what enables the database to store information and provide you with access to it.