- How do I add a custom shipping zone in WooCommerce?
- How do I change states in WooCommerce?
- How do I restrict shipping location in WooCommerce?
- How do I add different shipping options in WooCommerce?
- How do I add custom shipping method?
- How do I add custom shipping charges in WooCommerce?
- How do I change the default state in WooCommerce?
- How do I use states cities and places for WooCommerce?
- How do I automatically add country state and dropdown in WordPress?
- How do I restrict a state in WooCommerce?
- How do I use WooCommerce shipping classes?
How do I add a custom shipping zone in WooCommerce?
Adding a new zone
- Go to: WooCommerce > Settings > Shipping > Shipping Zones.
- Select Add shipping zone at the top.
- Enter a descriptive Zone Name, and select Zone Regions that apply. ...
- Select Limit to specific zip/postcodes (if applicable) to further narrow which customers match this zone.
How do I change states in WooCommerce?
To customize the list, you need to follow the steps below:
- Step 1: Open functions.php file in your theme folder and add below code: add_filter( 'woocommerce_states', 'custom_woocommerce_states' ); function custom_woocommerce_states( $states ) ...
- Step 2: Save the file and refresh the checkout page. That's it.
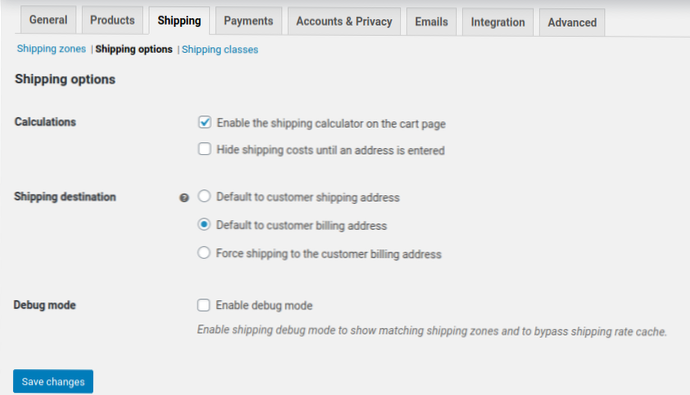
How do I restrict shipping location in WooCommerce?
Shipping Destinations
Navigate to WooCommerce > Settings > Restrictions. Navigate to the Payment Gateways, Shipping Methods, or Shipping Destinations section, depending on the type of restriction you want to create. Click the Add Restriction button.
How do I add different shipping options in WooCommerce?
Configure WooCommerce settings
Set up shipping zones to define different rates based on customers' locations. To assign shipping methods to zones, click Add Shipping Method. Choose Flat Rate, Free Shipping, or Local Pickup, and select the options and pricing you'd like for each one.
How do I add custom shipping method?
Table of Contents
- Step 1: Create config.xml file.
- Step 2: Create shipping model.
- Step 3: Create configuration file.
- Step 4: Enable module.
How do I add custom shipping charges in WooCommerce?
Setup and Configuration
- 1/ Go to: WooCommerce > Settings > Shipping.
- 2/ Hover over the Shipping Zone location that Flat Rate should be added to and select Edit. ...
- 3/ In the Shipping Methods box, select Add Shipping Method.
- 4/ Select Flat Rate from the dropdown.
- 6/ Select Add shipping method.
How do I change the default state in WooCommerce?
The preferred way to restrict shipping to just one country is in the WooCommerce Settings under General. And then in the new “Ship to specific countries” field that comes up, select just the country that you want. This modifies the input from a select to a static field which works with this plugin.
How do I use states cities and places for WooCommerce?
Automatic installation
- Go to your Dashboard » Plugins » Add new.
- In the search form write “States, Cities, and Places for WooCommerce”
- When the search return the result, click on the Install Now button.
- Finally, click on the Activate button.
- Enjoy the plugin!
How do I automatically add country state and dropdown in WordPress?
Installation
- Upload the entire country-state-city-dropdown-cf7 folder to the /wp-content/plugins/ directory.
- Kindly make sure 'contact form 7' plugin active before activate this plugin.
- Activate the plugin through the 'Plugins' menu in WordPress.
- Add form tags in desired contact form.
How do I restrict a state in WooCommerce?
Once you install and activate it, follow these simple steps.
- Open the plugin's global settings. You need to go to WooCommerce > Advanced Country Restrictions and click on Open global settings.
- Select how you'll restrict the categories. ...
- Select the state restriction settings. ...
- Edit the category state restrictions.
How do I use WooCommerce shipping classes?
Product Shipping Classes
- Go to: WooCommerce > Settings > Shipping > Shipping Classes. The screen lists existing classes.
- Select Add Shipping Class beneath the table. A new row appears.
- Enter a Shipping Class Name and description. Slug (unique identifier) can be left blank and auto-generated, or you can enter one.
- Save Shipping Classes.
![How do i create a an upvoting system like that of producthunt or coinhunt? [closed]](https://usbforwindows.com/storage/img/images_1/how_do_i_create_a_an_upvoting_system_like_that_of_producthunt_or_coinhunt_closed.png)